
x220_external.md 8.5 KB
title: ThinkPad X220 external flashing x-toc-enable: true ...
NOTE: Separate ROMs build (in the build system) for X220. Make sure to use the correct one for your laptop.
You can find flashrom under the flashrom/ directory in the Retroboot source
code release archives. Build it (from source) using the
Retroboot build instructions page.
This assumes that you unlocked the regions using ifdtool, and ran me_cleaner, when installing Retroboot the first time. Retroboot currently does not provide pre-compiled utilities, but you can download the source code archive of Retroboot from the download page and build these utilities using the instructions at Retroboot build instructions page.
You do not need to use a flash layout file in flashrom for this, but you can if you want. This guide assumes that you don't. The only time you really need one is when you're doing internal flashing, like when updating/changing your coreboot ROM after already having flashed it externally for the first time.
This guide shows you how to install coreboot (or Retroboot, in this case) onto an X220 that currently has the Lenovo BIOS firmware on it.
Refer to the Raspberry Pi page which tells you how to set up a Raspberry Pi for SPI flashing. Just buy some 2.54mm or 0.1inch dupont leads and use those with a test clip for SO8/SOIC8/SO-IC8 chip.
Ideally, if you know how to solder, you should cut the data wires in the middle (but not power and ground) on the flasher, on the wires from the flasher to the test clip, strip them, and solder 47ohm resistors. That is, don't use straight thru wire connection (0ohm) but use 47ohm resistors on the data lines. However, this isn't strictly required, just recommended. This applies when doing ISP (in system programming) but isn't really required when flashing new chips that have not yet been soldered to a mainboard.
Then with your resistors on the data lines, you can insulate using heat shrink tubing and a hot air jet.
Use of resistors is optional, but highly recommended if you're comfortable with doing a bit of soldering.
Remove all screws from the bottom of your laptop. Then push the keyboard forward and lift it out, disconnect it. Remove the palmrest.
Remove all screws from the bottom of your laptop. Then push the keyboard forward and lift it out, disconnect it. Remove the palmrest.
This photo shows the flash chip (peel back the tape to see it):
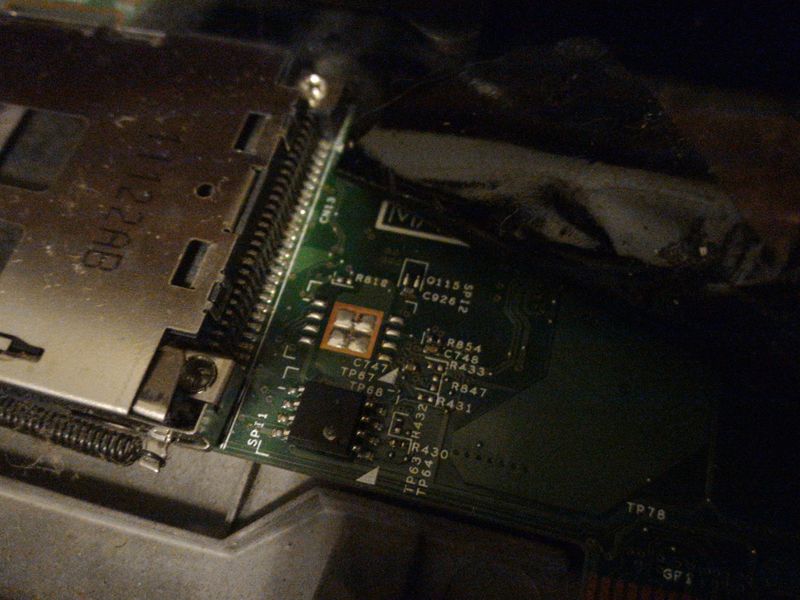
NOTE: this image is hotlinked from coreboot.org, for licensing reasons (it is not clear what license coreboot.org is using), because no X220 was physically available for the purpose of making this guide. Look at that picture and, note:
- Pin 1 of the chip is nearest to marking that says TP63
- Pin 4 is on right next to where it says TP68 in that photo
- Pin 5 is on the opposite side relative to pin 4
- Pin 8 is on the opposite side relative to pin 1
Here's another illustration of the chip pinout:
screen on this side
|5--4|
|6--3|
|7--2|
|8--1|
speakers on this side
It's 8MiB 25XX NOR flash.
It is assumed that you have the ROM images and me_cleaner compiled (well,
the me_cleaner utility is written in Python 3 and does not need to be
compiled). It is also assumed that you have the cbutils module compiled.
If not, build Retroboot using these instructions
Configure a Raspberry Pi for flashing 25XX NOR flash (you can use any SPI flasher, but the Raspberry Pi is currently the only SPI flasher documented on the Retroboot website).
DISCONNECT the charger and battery, so that there is no power supplied to the X220 mainboard. You will need to fully disassemble your laptop to remove the mainboard, to access the flash chip. No disassembly instructions are yet provided on the Retroboot website.
Connect your RPi via SOIC-8 test clip to the X220 flash chip (see above photo) and dump the firmware. After your clip is connected to a chip (remember, use external 3.3v from your Raspberry Pi. Pin 1 on the RPi GPIO header is 3.3v as specified on the RPi guide)
Never connect the clip while 3.3v is live. Only turn on the power after the clip is connected, to reduce the chance of shorting/frying anything by mistake.
Ideally, your data lines (from RPi to test clip) should have 47ohm resistors on them (manufacturers recommend this when doing ISP, short for In System Programming. it's when you flash a chip that's already mounted to a mainboard which is exactly what you're doing in this case).
On your Raspberry Pi, it is assumed that you're running Raspbian. In Raspbian
you can just do sudo raspi-config and enable SPI in there.
Assuming you've got your RPi wired correctly, your clip correctly connected and 3.3v is active on the VCC pins of the flash chips, you should be able to flashrom.
Do not flash yet. First, you should make a full backup of the chip:.
sudo flashrom -p linux_spi:dev=/dev/spidev0.0,spispeed=32768 -r 8mb_dump.bin
Make several dumps, and compare them in sha512sum. If the dumps all have the
same checksum, then they are good dumps.
This is flashrom running on your Raspberry Pi, which you SSH'd into. You can actually download Retroboot (from Git) on your Raspberry Pi, and build flashrom using the instructions on the Retroboot website
If flashrom complains about multiple detected flashchips, per definitions,
just do what it says and pick one using -c option. If it fails, pick another
one. Make sure to get a good dump.
If these are successful, you'll see these files created. Take several of these
and compare in sha512sum to verify the hashes; if you dump a ROM with the
same checksum several times, then it's very likely a good dump.
Keep these dumps safe, backed up in several places on several storage mediums. You might need them at some point in the future.
Now, please note: the first 5MiB of the dump you made contains descriptor, ME and GbE. You need these!
Extract the 5MiB region (final 3MiB part is BIOS region):
dd if=8mb_dump of=5mb.bin bs=5M count=1
The file 8mb_dump above is the full backup you made of the flash contents.
Retroboot distributes 8MiB ROM images, for just the BIOS region in the upper 3MiB of the chip on your X220. You should join the 5MiB file from above with the upper 3MiB of your retroboot ROM. However, before you do so:
./meclean 5mb.bin
Then your file will be under bin/neutered/ in the Retroboot build system.
Now use ifdtool to set all regions read-write (this makes internal re-flashing
much easier later on). Like so (ifdtool built in the Retroboot build system):
./coreboot/x230_4mb/util/ifdtool/ifdtool --unlock ./bin/neutered/5mb.bin.neutered
The above commands are from the Retroboot build system, and assume you've
build the cbutils and me_cleaner modules. It is strongly recommended that
you run me_cleaner and unlock your descriptor+ME region using ifdtool, as
above.
When you run the ifdtool command, you'll have a new file
named 5mb.bin.neutered.new
Now, take your 8MiB ROM from Retroboot and insert the 5MiB file containing your neutered Intel ME with unlocked IFD regions:
dd if=5mb.bin.neutered.new of=8mb.x220.retroboot.rom bs=5M count=1 conv=notrunc
Previously, the first 5MiB of the Retroboot ROM was just 0xFF padding but now it should contain your descriptor, GbE and Intel ME. The ROM is now ready to flash on your machine.
In the above example, 5mb.bin.neutered.new is the first 5MiB of the dump
from your X220 (prior to flashing), run through me_cleaner and then run
through ifdtool --unlock; combined, these two tasks neutered the Intel ME
and set all regions read-write in the flash. The 8mb.x220.retroboot.rom file
in the above example is simply a 8MiB X220 ROM (of your choice) from
Retroboot, either in a release or compiled by you from the source code.
Now flash Retroboot (8MiB image). We will use the ROM images prepared above. Like so (Raspberry Pi was used, when writing this guide):
sudo flashrom -p linux_spi:dev=/dev/spidev0.0,spispeed=32768 -w 8mb.x220.retroboot.rom
Ditto about multiple flashchip definitions thing. Use -c option if flashrom
tells you to. When you've successfully flashed.
If successful, flashrom will say VERIFIED after you've finished flashing.
If you're not successful, check RPi wiring and check you're connecting the clip the right way round. Also, check the software configuration on your RPi.
If you still can't get it working, check the voltage again on the flash chip vcc pins. Ensure that you are correctly providing 3.3v to pin 8 of the flash chip.