hp8200sff.md 10 KB
title: HP Elite 8200 SFF/MT and 6200 Pro Business x-toc-enable: true ...
PLEASE READ THESE INSTRUCTIONS BEFORE INSTALLING, OR YOU MIGHT BRICK YOUR MACHINE: SAFETY PRECAUTIONS


 | ***Specifications*** | |
|---------------------------|---------------------------------------------|
| **Manufacturer** | HP |
| **Name** | Compaq 8200 Elite SFF |
| | Compaq 8200 Elite MT |
| **Released** | 2011 |
| **Chipset** | Intel Q67 |
| **CPU** | Intel Sandy/Ivy Bridge |
| **Graphics** | Intel HD Graphics or PCI-e low profile card |
| **Memory** | Up to 32GB (4x8GB) |
| **Architecture** | x86_64 |
| **Intel ME/AMD PSP** | Present, neutered |
| **Flash chip** | SOIC-8 8MiB |
```
W+: Works without blobs;
N: Doesn't work;
W*: Works with blobs;
U: Untested;
P+: Partially works;
P*: Partially works with blobs
```
| ***Features*** | |
|---------------------------------------------------|----|
| **Internal flashing with original boot firmware** | W* |
| **Display (Intel GPU)** | W+ |
| **Display (PCIe graphics card)** | W+ |
| **Audio** | W+ |
| **RAM Init** | W+ |
| ***Payloads supported*** | |
|---------------------------|-------|
| **GRUB** | Works |
| **SeaBIOS** | Works |
| **SeaBIOS with GRUB** | Works |
Disable security before flashing
Before internal flashing, you must first disable /dev/mem protections. Make
sure to re-enable them after you're finished.
See: Disabling /dev/mem protection
Introduction
Libreboot has support for this, in the Git repository and release versions from 20230423 onwards.
Brief board info
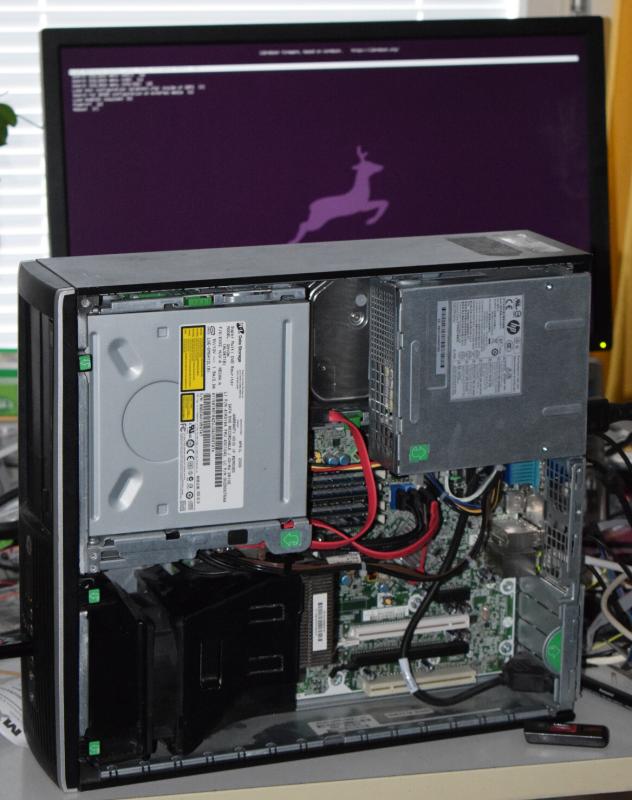
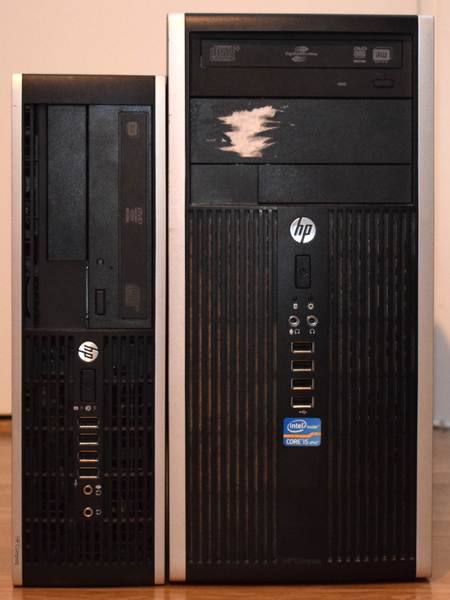
HP Elite 8200 SFF is a small-form-factor desktop of Intel Sandybridge platform which you can read more about here:
https://support.hp.com/gb-en/product/hp-compaq-8200-elite-small-form-factor-pc/5037931
MT is an identical board with a larger chassis and more powerful power supply:
https://support.hp.com/gb-en/product/hp-compaq-8200-elite-desktop-pc-series/5037940
Here's the Technical Reference Manual. This system supports Ivy Bridge processors too. The original BIOS won't even POST with those, but with Libreboot they work fully.
Installation of Libreboot
You can actually just compile the Libreboot ROM for this, and flash the entire ROM.
Internal flashing from OEM BIOS is possible by setting a jumper on the board. Step by step instructions for this are below.
The coreboot project proper has technical details on why this works if you are interested. It also has external flashing instructions if you need to recover from an unbootable BIOS:
https://doc.coreboot.org/mainboard/hp/compaq_8200_sff.html
You can build the images for it in Libreboot like so:
./mk -b coreboot hp8200sff_8mb
More information about building ROM images can be found in the build guide.
If you plan on using a graphics card (other than the integrated graphics of your CPU), choose one of the files which name contains both "seabios" and "txtmode".
This is a Sandybridge board which means that a neutered ME image is required
if you wish to flash the ME region. Libreboot's build system automatically
downloads, neuters (using me_cleaner) and inserts this if compiling from
source.
If you're using Libreboot release ROM images, the ME image has been scrubbed and you must re-insert it. Use the information on this guide to know how to do that:
Insert vendor files on Intel Sandybridge/Ivybridge/Haswell platforms
You may also wish to change the default MAC address if you're planning to use the onboard Intel Gigabit Ethernet. You can do this using the information in the same guide linked above, or read the nvmutil manual:
Modify MAC addresses with nvmutil.
Internal flashing from vendor BIOS
The vendor BIOS imposes write-protections in the Flash Descriptor and runtime. However, the flash descriptor can be bypassed by bridging a jumper and the runtime protections only apply to a fixed address block. Since neutering the Management Engine frees up a lot of space, we can just install an intermediate Libreboot image there. This removes all write-protections so has the same end result as external flashing: a completely unlocked system.
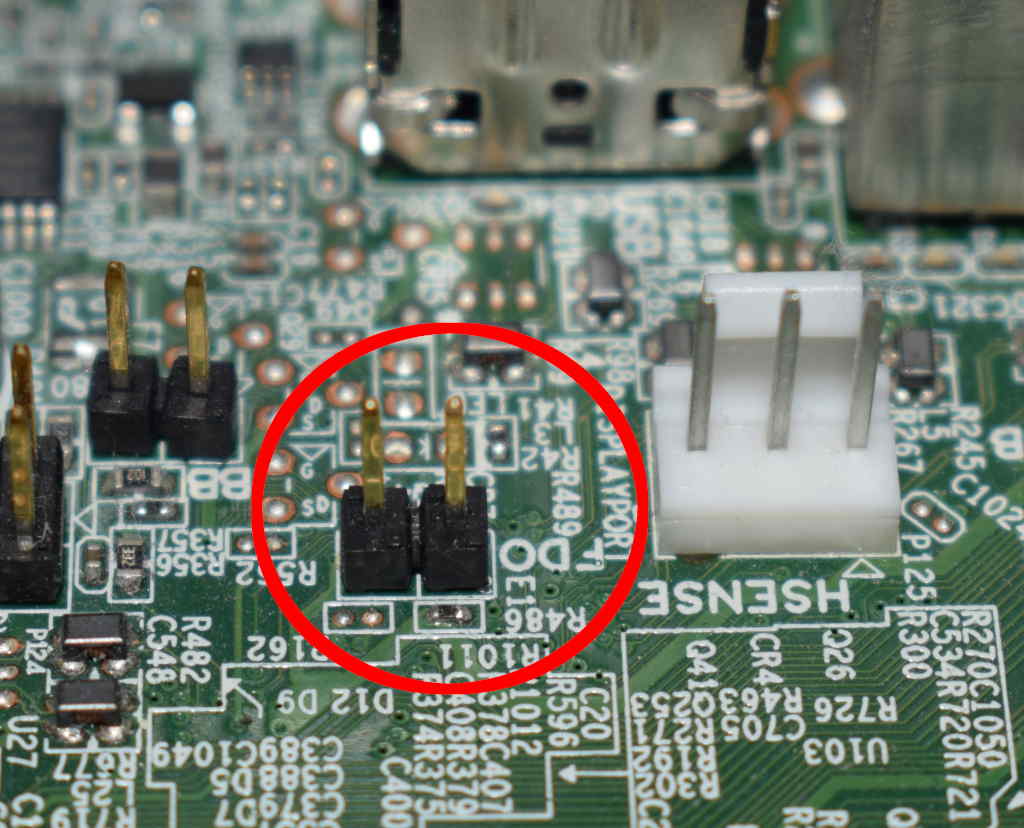
Power off the computer. Remove the side panel. Near the back USB ports find the jumper labelled FDO.
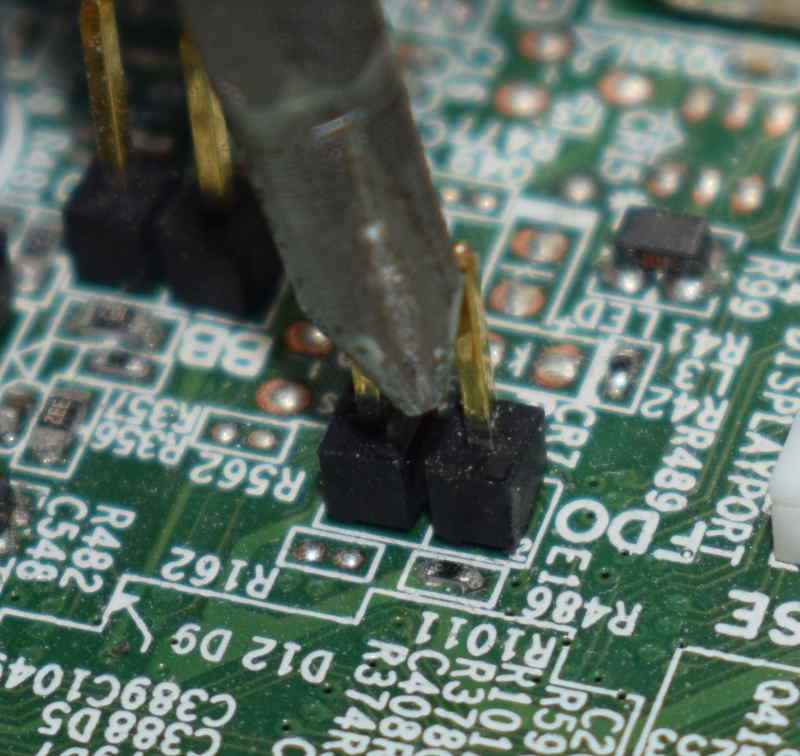
You need to short the two pins circled. Use a jumper block if you have one but a screwdriver will do the job fine too. Hold the tip between the pins until you can see the normal BIOS boot screen.
NOTE: Libreboot standardises on flashprog now, as of 27 January 2024, which is a fork of flashrom.
Now, run this command:
flashprog -p internal -c MX25L6406E/MX25L6408E
The output should contain the text "The Flash Descriptor Override Pin-Strap is set". If it doesn't, start again from the beginning.
Now build the 4 MiB Libreboot image.
./mk -b coreboot hp8200sff_4mb
More information about building ROM images can be found in the build guide.
Also build ifdtool. It will be needed soon.
cd src/coreboot/default/util/ifdtool
make
sudo make install
Now choose the image you want from bin/hp8200sff_4mb.
We'll refer to it as libreboot4.rom. We need to pad it to 8 MiB:
dd if=/dev/zero bs=4M count=1 >> libreboot4.rom
Flash the Libreboot image with a tweaked layout:
ifdtool libreboot4.rom -f layout
flashprog -p internal -c MX25L6406E/MX25L6408E -w libreboot4.rom -l layout -i fd -i gbe -i bios -i me
Power off the computer. Make sure to power off, rebooting is not enough!
Power on the computer. Now we can flash the full 8 MiB image. Boot to an OS with flashprog again.
NOTE: Libreboot standardises on flashprog now, as of 27 January 2024, which is a fork of flashrom.
Pick a Libreboot image of your choice from bin/hp8200sff_8mb
or from a release archive. We'll refer to it as libreboot8.rom.
flashprog -p internal -c MX25L6406E/MX25L6408E -w libreboot8.rom
Power cycle the computer again.
HP 6200 Pro Business PC
According to this page from the vendor, HP BIOS updates are the same on both the 8200 SFF Elite and 6200 Pro Business desktop PCs; therefore, we believe that the Libreboot config for 8200 SFF will also work on 6200 Pro Business PCs. That page is here: https://support.hp.com/fi-fi/drivers/selfservice/swdetails/hp-compaq-8200-elite-small-form-factor-pc/5037931/swItemId/vc-229778-2
The config for this board is courtesy of Riku Viitanen (Riku_V on Libreboot
IRC), who tested and confirmed the following functionality:
- Sandy Bridge (i5-2400) and Ivy Bridge (i5-3570S) CPUs
- 4x8 GB RAM (Sandy Bridge: 1333MHz, Ivy Bridge: 1600MHz)
- PS/2 keyboard and mouse
- USB keyboard (a bit laggy on GRUB)
- Boot from USB and DVD
- Gigabit ethernet
- VGA and DisplayPort (Intel graphics), with libgfxinit (native video init)
- Headphone output, PC speaker
- S3 suspend, wake on USB keyboard
- lm_sensors outputs CPU core temperatures only
- Both PCIe x16 slots, external GPU works with SeaBIOS
- PCI
- SATA
- USB ports
- Serial port (RS-232)
- Wake on LAN
At the time of adding this board to Libreboot, the following is untested:
- Parallel port (internal header on the board)
- Floppy drive. The case has a spot for it, but I can't find the header (P10).
According to the initial coreboot port from 2018, the following also works:
- EHCI debug (not enabled by Libreboot configs)
- Native (libre) raminit with up to four DIMM modules (also tested by Riku and confirmed working, with 32GB RAM installed as 4x8GB)
TPM
According to git logs, TPM should work, and a commit from 2018 at revision
ID 39d0e2a2cf45e28cdddd0fe0c88f94ce527ab1ef in coreboot makes the TPM visible
to operating systems.
PSU Fan control
See coreboot commit 9bd601584350f51f112b15a7369f9aa82f1d0919 - labelled
by commit message superio/nuvoton/npcd378: Add PSU fan control.
Per this commit, SuperIO-based fan control is supported on HP Elite 8200 SFF.
TODO for testing the above is here:\ https://codeberg.org/libreboot/lbmk/issues/9
This is controlled via nvramtool to modify the value in sram. See:
psu_fan_lvl=3<-- default setting in coreboot, and Libreboot.
Other values possible: from reading the source code, it is implied that the number can be between 0 and 7. If the value is set higher than 7, it will default back to 3.
Libreboot locks CMOS/NVRAM settings, but you can change the default setting in
the ROM by using the -C option in nvramtool. You can find this under the
directory src/coreboot/default/util/nvramtool when downloading coreboot inside
of lbmk by running the command:
./update trees -f coreboot default
Go in there and type make to build nvramtool. Simply run nvramtool without
arguments, and it will show a list of options.

